ElectronParade
Project 8: Build Your Own Desktop Weather Station
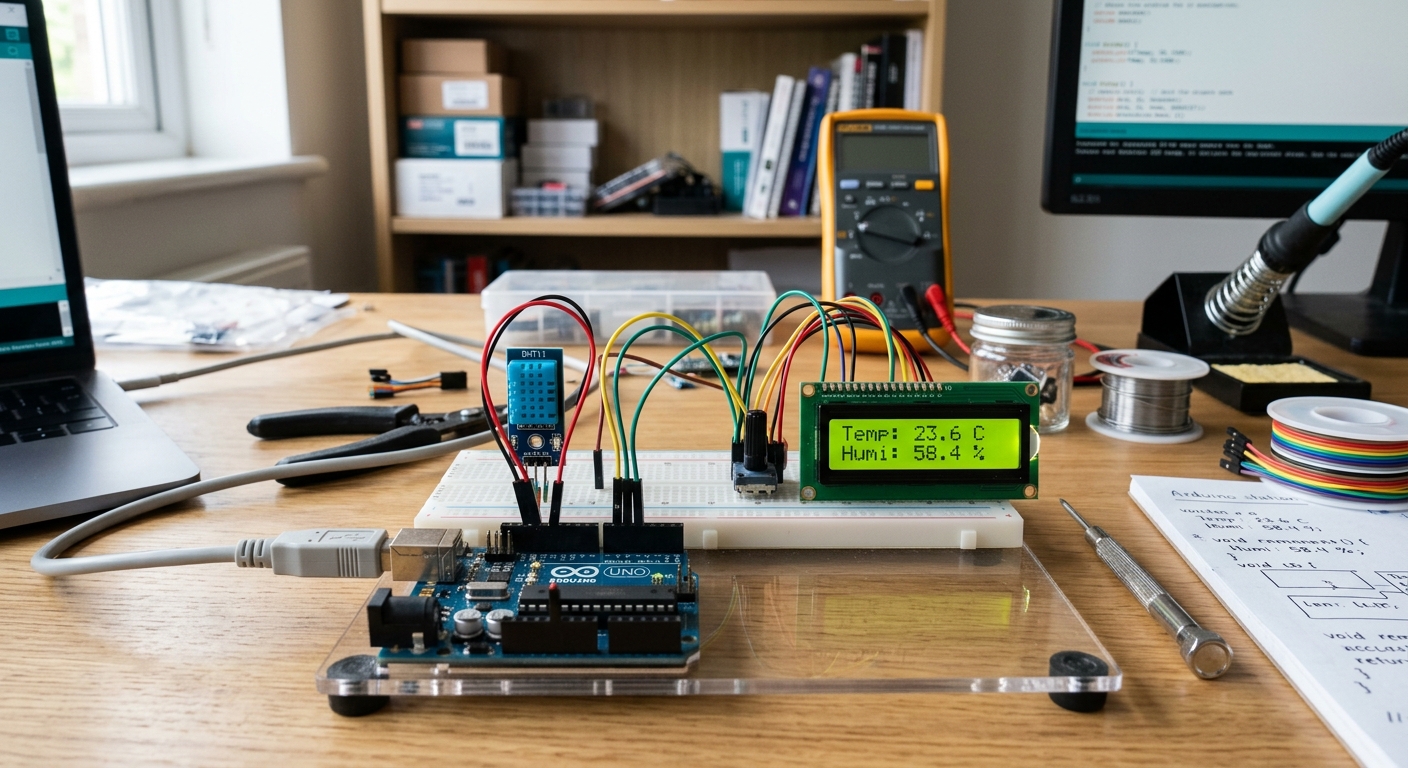
Is it hot in here, or is it just the soldering iron? Today, we’re building a highly practical project: a real-time digital desktop weather station. By combining an Arduino, a DHT11 temperature/humidity sensor, and a classic 16x2 LCD, you’ll have your own climate monitor.
How It Works
This project is a fantastic introduction to combining different modules:
- The DHT11 Sensor measures ambient temperature and humidity. It’s inexpensive and perfectly accurate for indoor use.
- The Arduino Uno reads the digital signal from the DHT11 and converts it into Celsius, Fahrenheit, and relative humidity percentages.
- The 16x2 I2C LCD Display takes the data and displays it on a retro-style backlit screen. Using an “I2C” module means we only need 4 wires instead of 12!
Recommended Gear & Components
Here are the specific parts you need to bring this weather station to life. (Using these links supports the site!)
- Arduino UNO R3: Your main microcontroller. Get an Arduino UNO R3 clone here.
- DHT11 Temperature & Humidity Sensor: The climate tracker. Get the DHT11 Sensor Module here.
- 16x2 I2C LCD Display: The screen to show your readouts. The I2C backpack is a must! Get the 16x2 I2C LCD here.
- Jumper Wires: Female-to-Male and Male-to-Male.
Wiring Guide
Wiring I2C and the DHT11 is delightfully simple. Make sure your Arduino is unplugged before you start wiring.
1. Wiring the 16x2 I2C LCD
The I2C backpack reduces the LCD wiring down to just four pins:
- GND -> Arduino GND
- VCC -> Arduino 5V
- SDA -> Arduino A4 (or the dedicated SDA pin)
- SCL -> Arduino A5 (or the dedicated SCL pin)
2. Wiring the DHT11 Sensor Module
Note: If you have a bare 4-pin DHT11 instead of a 3-pin module, you will need a 10k pull-up resistor between VCC and the Data pin. Most modules include this built-in.
- GND (-) -> Arduino GND
- VCC (+) -> Arduino 5V
- DATA (Out) -> Arduino Digital Pin 2
The Code
To run this code, you’ll need to install two libraries in the Arduino IDE. Go to Sketch > Include Library > Manage Libraries… and search for:
- “DHT sensor library” by Adafruit (also install the Adafruit Unified Sensor library if prompted).
- “LiquidCrystal I2C” by Frank de Brabander.
Once installed, copy and paste this code into your Arduino IDE, hit verify, and upload!
#include <Wire.h>
#include <LiquidCrystal_I2C.h>
#include <DHT.h>

// Define the pin the DHT11 data line is connected to
#define DHTPIN 2

// Define the type of DHT sensor
#define DHTTYPE DHT11

// Initialize the DHT sensor
DHT dht(DHTPIN, DHTTYPE);

// Initialize the LCD.
// The I2C address is usually 0x27 for these 16x2 modules.
LiquidCrystal_I2C lcd(0x27, 16, 2);

void setup() {
  // Start the serial monitor for debugging
  Serial.begin(9600);

  // Initialize the LCD and turn on the backlight
  lcd.init();
  lcd.backlight();

  // Initialize the DHT sensor
  dht.begin();

  // Print a welcome message
  lcd.setCursor(0, 0);
  lcd.print("Weather Station");
  lcd.setCursor(0, 1);
  lcd.print("Initializing...");
  delay(2000);
  lcd.clear();
}

void loop() {
  // Wait a few seconds between measurements.
  // The DHT11 is a slow sensor, so 2 seconds is perfect.
  delay(2000);

  // Read humidity as a percentage
  float h = dht.readHumidity();
  // Read temperature as Fahrenheit (isFahrenheit = true)
  float t = dht.readTemperature(true);

  // Check if any reads failed and exit early (to try again)
  if (isnan(h) || isnan(t)) {
    Serial.println("Failed to read from DHT sensor!");
    lcd.setCursor(0, 0);
    lcd.print("Sensor Error!  ");
    return;
  }

  // Print the Temperature to the first row of the LCD
  lcd.setCursor(0, 0);
  lcd.print("Temp: ");
  lcd.print(t);
  lcd.print(" F   "); // Extra spaces to clear old artifacts

  // Print the Humidity to the second row of the LCD
  lcd.setCursor(0, 1);
  lcd.print("Hum:  ");
  lcd.print(h);
  lcd.print(" %   "); // Extra spaces to clear old artifacts

  // Optional: Print to Serial Monitor
  Serial.print("Humidity: ");
  Serial.print(h);
  Serial.print("%  Temperature: ");
  Serial.print(t);
  Serial.println("°F");
}
Troubleshooting
- Blank Screen but Backlight is On? There is a tiny blue potentiometer (a small dial) on the back of the I2C LCD backpack. Use a small screwdriver to turn it until the text contrast is visible.
- “Sensor Error!” on the screen? Double-check your DHT11 wiring. Make sure the data pin is securely connected to Digital Pin 2, and that your sensor is receiving 5V.
- Code won’t compile? Verify you have installed the LiquidCrystal I2C and DHT Sensor libraries through the Library Manager.
Enjoy your new desktop weather station! Try modifying the code to display Celsius instead, or add a buzzer that triggers an alarm if the room gets too hot.