ElectronParade
Project 7: Build an Ultrasonic Radar Screen
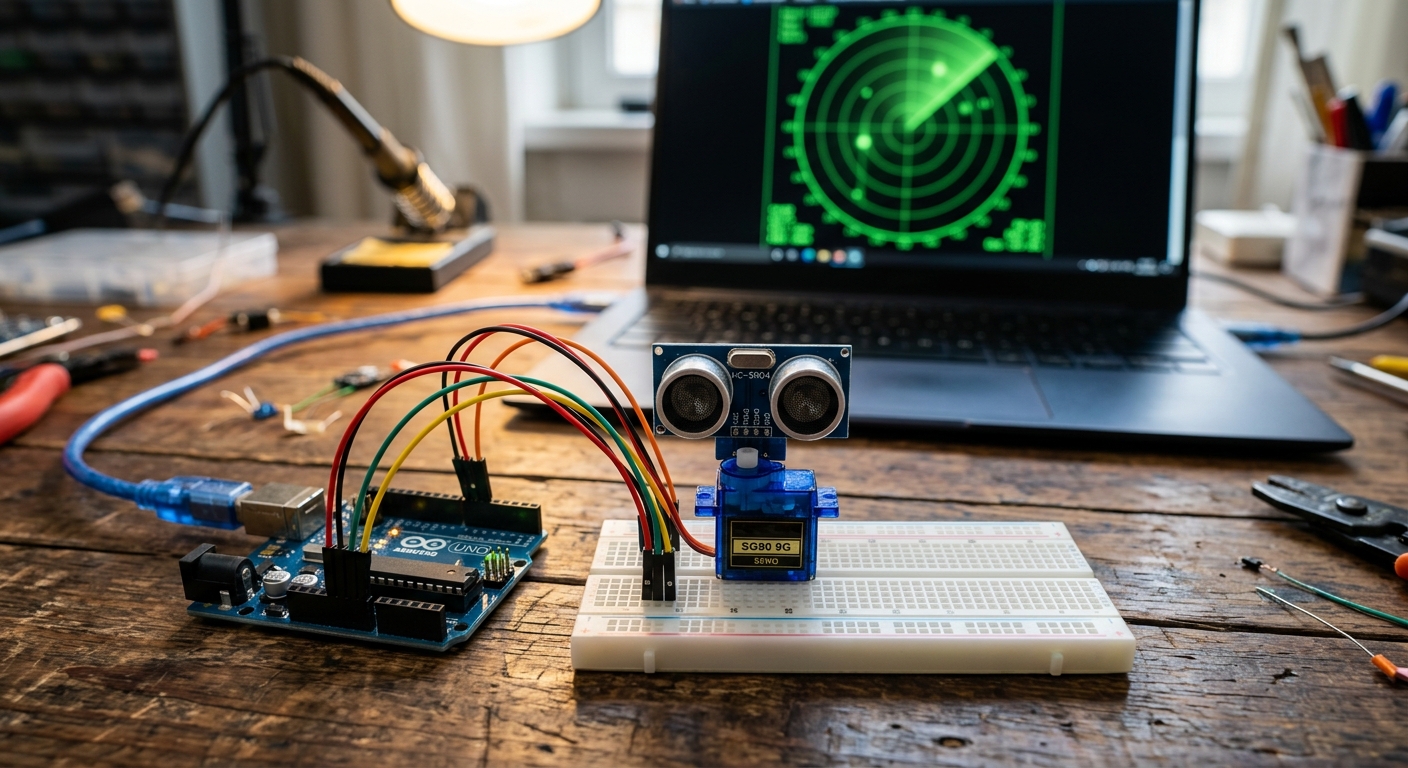
Ever wanted to see the world like a submarine or a stealth jet? In this project, we’re combining two components we learned about recently: the HC-SR04 Ultrasonic Sensor and a Micro Servo Motor.
By mounting the ultrasonic sensor on top of the servo, we can physically sweep the sensor back and forth. We’ll send the distance data from the Arduino to your computer over the USB cable, and use a visual programming language called Processing to draw a cool, sweeping green radar screen!
What You’ll Need
Here is the hardware required for this project:
- Arduino Uno R3
- HC-SR04 Ultrasonic Distance Sensor
- SG90 Micro Servo Motor
- Breadboard and Jumper Wires
- A small bracket, rubber band, or double-sided tape to attach the sensor to the servo arm.
Step 1: The Wiring
The wiring for this project is quite simple, as both the servo and the ultrasonic sensor only need a few connections.
HC-SR04 Ultrasonic Sensor:
- VCC: to Arduino 5V
- GND: to Arduino GND
- Trig: to Arduino Digital Pin 10
- Echo: to Arduino Digital Pin 11
SG90 Servo Motor:
- Red Wire (Power): to Arduino 5V
- Brown/Black Wire (Ground): to Arduino GND
- Yellow/Orange Wire (Signal): to Arduino Digital Pin 12
Note: Since both components need 5V and GND, use your breadboard power rails to distribute the power from the Arduino to both devices.
Mount the ultrasonic sensor to the servo motor arm so that when the motor sweeps from 0 to 180 degrees, the sensor looks around the room.
Step 2: The Arduino Code
The Arduino’s job is to tell the servo to move a few degrees, take a distance measurement, and send that information to the computer over the Serial port.
Upload this code to your Arduino:
#include <Servo.h>

const int trigPin = 10;
const int echoPin = 11;
const int servoPin = 12;

Servo radarServo;
long duration;
int distance;

void setup() {
  pinMode(trigPin, OUTPUT);
  pinMode(echoPin, INPUT);
  radarServo.attach(servoPin);
  Serial.begin(9600);
}

void loop() {
  // Sweep from 15 to 165 degrees
  for(int i = 15; i <= 165; i++) {
    radarServo.write(i);
    delay(30);
    distance = calculateDistance();

    // Send data to Processing: Angle,Distance
    Serial.print(i);
    Serial.print(",");
    Serial.print(distance);
    Serial.println(".");
  }

  // Sweep back from 165 to 15 degrees
  for(int i = 165; i > 15; i--) {
    radarServo.write(i);
    delay(30);
    distance = calculateDistance();

    Serial.print(i);
    Serial.print(",");
    Serial.print(distance);
    Serial.println(".");
  }
}

int calculateDistance() {
  digitalWrite(trigPin, LOW);
  delayMicroseconds(2);
  digitalWrite(trigPin, HIGH);
  delayMicroseconds(10);
  digitalWrite(trigPin, LOW);
  duration = pulseIn(echoPin, HIGH);
  distance = duration * 0.034 / 2;
  return distance;
}
Step 3: The Processing Code
To draw the radar screen, we will use Processing, a free visual sketchbook software that uses Java. Download and install Processing if you haven’t already.
Copy and paste the following code into Processing. Important: You must change COM3 on line 12 to match your Arduino’s serial port (e.g., /dev/cu.usbmodem... on Mac or COM4 on Windows).
import processing.serial.*;

Serial myPort;
String data = "";
String angle = "";
String distance = "";
int iAngle, iDistance;

void setup() {
  size(900, 600);
  // CHANGE THIS PORT to match your Arduino!
  myPort = new Serial(this, "COM3", 9600);
  myPort.bufferUntil('.');
}

void draw() {
  fill(0, 5); // Fading effect for trailing radar
  noStroke();
  rect(0, 0, width, height);

  fill(0, 255, 0);
  drawRadar();
  drawLine();
  drawObject();
}

void serialEvent(Serial myPort) {
  data = myPort.readStringUntil('.');
  data = data.substring(0, data.length() - 1);
  int commaIndex = data.indexOf(',');

  if (commaIndex > 0) {
    angle = data.substring(0, commaIndex);
    distance = data.substring(commaIndex + 1, data.length());
    iAngle = int(angle);
    iDistance = int(distance);
  }
}

void drawRadar() {
  pushMatrix();
  translate(width/2, height-50);
  noFill();
  strokeWeight(2);
  stroke(0, 255, 0);
  arc(0, 0, 800, 800, PI, TWO_PI);
  arc(0, 0, 600, 600, PI, TWO_PI);
  arc(0, 0, 400, 400, PI, TWO_PI);
  arc(0, 0, 200, 200, PI, TWO_PI);
  line(-400, 0, 400, 0);
  line(0, 0, -400*cos(radians(30)), -400*sin(radians(30)));
  line(0, 0, -400*cos(radians(60)), -400*sin(radians(60)));
  line(0, 0, -400*cos(radians(90)), -400*sin(radians(90)));
  line(0, 0, -400*cos(radians(120)), -400*sin(radians(120)));
  line(0, 0, -400*cos(radians(150)), -400*sin(radians(150)));
  popMatrix();
}

void drawLine() {
  pushMatrix();
  translate(width/2, height-50);
  strokeWeight(9);
  stroke(0, 255, 0);
  line(0, 0, 400*cos(radians(iAngle)), -400*sin(radians(iAngle)));
  popMatrix();
}

void drawObject() {
  pushMatrix();
  translate(width/2, height-50);
  strokeWeight(9);
  stroke(255, 10, 10);
  if(iDistance < 40 && iDistance > 0) {
    float pixsDistance = iDistance * 10;
    line(pixsDistance*cos(radians(iAngle)), -pixsDistance*sin(radians(iAngle)),
         400*cos(radians(iAngle)), -400*sin(radians(iAngle)));
  }
  popMatrix();
}
Step 4: Run It!
With your Arduino connected and running its code, hit the Run button (the play icon) in Processing. A window will open showing a classic green radar sweep. If an object is within 40cm of the sensor, it will appear as a bright red blip on the screen!
Experiment with putting different objects around the sensor to watch the radar map them in real-time.