You load up the I2C Scanner sketch to find your screen’s address, but instead of a nice 0x27, the serial monitor says “No I2C devices found” or it completely freezes.
I2C is a fantastic protocol, but it is notoriously dramatic about its physical wiring. If one wire is loose, the whole bus crashes. Let’s find out which wire is betraying you.
1. You Swapped SDA and SCL
This is the number one cause of I2C failure. It is incredibly easy to accidentally cross the wires when using a breadboard.
- SDA (Data): Must go to Arduino pin A4 (on Uno/Nano).
- SCL (Clock): Must go to Arduino pin A5 (on Uno/Nano).
Double-check your jumper wires. If you are using a Mega, SDA is 20 and SCL is 21. If you are using a Leonardo/Micro, SDA is 2 and SCL is 3.
2. The Scanner Hangs Completely (Missing Pull-Up Resistors)
If your serial monitor prints “Scanning…” and then never prints anything else, the Arduino is stuck waiting for a response that will never come. The I2C bus is “hanging”.
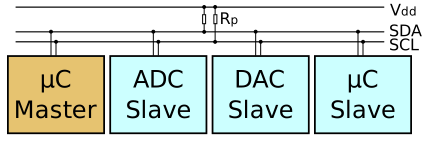
I2C relies on pull-up resistors to keep the SDA and SCL lines HIGH when no one is talking. The Arduino Uno has very weak internal pull-up resistors, which are usually enough for one sensor. But if you have long wires, multiple devices, or a finicky module, the signal degrades.
The Fix: Add a 4.7kΩ resistor between SDA and 5V (or 3.3V, depending on your board), and another 4.7kΩ resistor between SCL and 5V/3.3V.
3. Voltage Mismatches (5V vs 3.3V)
An Arduino Uno operates at 5V logic. Many modern sensors (like the BME280 or MPU6050) operate at 3.3V.
If you connect a 3.3V sensor directly to the Uno’s 5V I2C pins, you might permanently damage the sensor. Even if it survives, the logic levels might not be recognized, resulting in “Device not found.”
The Fix: Use a Logic Level Converter. Connect the 5V logic to the High Voltage (HV) side, and the 3.3V logic to the Low Voltage (LV) side.
4. Poor Connections and Breadboard Woes
If you are using a cheap breadboard or loose jumper wires, the physical connection might be failing. I2C uses rapid digital pulses (clock speed is 100kHz standard); a slightly loose wire adds capacitance and resistance that destroys the square wave signal.
Try moving your module to a different part of the breadboard, or swap out your jumper wires for new ones.
5. Check the Module’s Solder Joints
If you bought a bare module that required you to solder the header pins yourself, inspect your work. A cold solder joint or a microscopic bridge between the SDA and SCL pins will take down the entire bus.