The ESP32-CAM is one of the most incredible bargains in the maker world. For just a few dollars, you get a powerful Wi-Fi microcontroller slapped together with a tiny camera module.
We are going to build a standalone IP surveillance camera. It will host its own web server and stream live video to your phone. Now you can finally figure out which cat is destroying the couch.
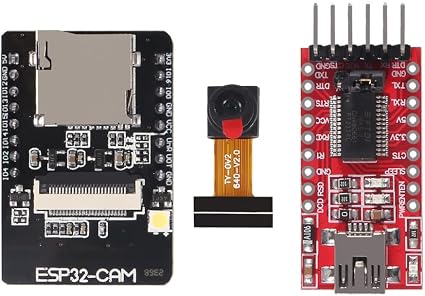
The Gear You Need
- ESP32-CAM Module with OV2640 Camera
- FTDI USB to TTL Serial Converter – The ESP32-CAM does not have a built-in USB port, so you need this programmer to upload code.
- Jumper wires (Female-to-Female)
- 5V Power Supply – Once programmed, you can power it with any standard 5V wall adapter.
(Links above are affiliate links. As an Amazon Associate, we earn from qualifying purchases.)
Setting Up the ESP32-CAM for Programming
Because the ESP32-CAM lacks a USB port, wiring it to an FTDI programmer can be slightly tricky the first time.
Wiring to the FTDI Programmer:
- ESP32 5V ➔ FTDI VCC (Ensure your FTDI jumper is set to 5V)
- ESP32 GND ➔ FTDI GND
- ESP32 U0R (RX) ➔ FTDI TX
- ESP32 U0T (TX) ➔ FTDI RX
CRITICAL STEP: The Flash Jumper To put the ESP32-CAM into “programming mode,” you must connect GPIO 0 to GND before you plug the FTDI adapter into your computer.
- Use a jumper wire to connect
IO0toGNDon the ESP32-CAM. - Plug the USB into your PC.
- Upload the code.
- Unplug the USB, remove the
IO0toGNDjumper wire, and plug it back in to run normally!
Installing ESP32 Board Support
If you haven’t used an ESP32 in the Arduino IDE before, you need to add the board manager URL:
- Go to File > Preferences.
- Add this URL to the “Additional Boards Manager URLs” field:
https://raw.githubusercontent.com/espressif/arduino-esp32/gh-pages/package_esp32_index.json - Go to Tools > Board > Boards Manager, search for “esp32”, and click Install.
- Select AI Thinker ESP32-CAM from the board list.
The Code (CameraWebServer)
The code to stream video is actually built right into the ESP32 Arduino core examples! It is highly optimized and includes face detection/recognition libraries.
- Go to File > Examples > ESP32 > Camera > CameraWebServer.
- Comment out all the camera models except the AI Thinker:
// #define CAMERA_MODEL_WROVER_KIT // #define CAMERA_MODEL_ESP_EYE // #define CAMERA_MODEL_M5STACK_PSRAM // #define CAMERA_MODEL_M5STACK_WIDE #define CAMERA_MODEL_AI_THINKER - Enter your Wi-Fi credentials:
const char* ssid = "YOUR_WIFI_SSID"; const char* password = "YOUR_WIFI_PASSWORD"; - Click Upload. (Don’t forget to have GPIO 0 tied to GND!). If the IDE says “Connecting…”, press the small reset button on the bottom of the ESP32-CAM board.
Viewing the Stream
Once the upload is done:
- Unplug the USB cable.
- Remove the jumper wire between GPIO 0 and GND.
- Plug the USB cable back in to power the board.
- Open the Arduino Serial Monitor at 115200 baud.
- Press the reset button on the ESP32-CAM again.
- The Serial Monitor will print out an IP Address (e.g.,
http://192.168.1.150). - Open a web browser on a device connected to the same Wi-Fi network and go to that IP address.
Click “Start Stream” at the bottom of the web interface, and you will see live video from your new DIY surveillance camera!
Next Steps
- Home Assistant Integration: In Home Assistant, you can add a generic MJPEG camera. Set the stream URL to
http://<ESP32_IP_ADDRESS>:81/stream. - 3D Printed Case: There are hundreds of fantastic 3D printable enclosures for the ESP32-CAM on Thingiverse and Printables. Mount it to your front porch or use it to watch your 3D printer!