ElectronParade
Welcome back to the Academy!
For a long time, we’ve relied on standard PWM to squeeze basic beeps and boops out of simple piezo buzzers. But what if your project needs a bit more personality? What if you want to play real, crisp audio files, voice prompts, or high-quality sound effects?
That’s exactly what we are covering today. We are going to give your projects a voice using I2S (Inter-IC Sound) on the ESP32.
Why Use I2S for Audio?
When working with microcontrollers, you have a few options for generating sound, but I2S stands out for several reasons:
- High Fidelity: I2S provides significantly higher quality audio than standard PWM generation.
- Hardware Acceleration: The ESP32 has a dedicated hardware peripheral for I2S. This means it offloads the heavy lifting from the main CPU, allowing your code to run smoothly while audio plays in the background via DMA (Direct Memory Access).
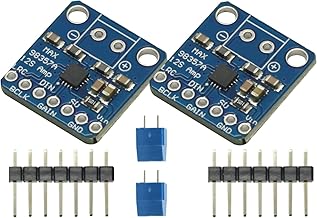
- Plug and Play Amplifiers: It integrates perfectly with external I2S DACs (Digital-to-Analog Converters) and amplifiers, like the popular MAX98357A breakout board, giving you clean, amplified audio with minimal wiring.
Basic I2S Setup Code
To get started, you’ll need to configure the I2S driver. Here is a basic code snippet demonstrating how to initialize the I2S peripheral on the ESP32 using the standard ESP-IDF driver functions in your Arduino IDE:
#include <Arduino.h>
#include <driver/i2s.h>

// Define your I2S connections to the DAC/Amplifier
#define I2S_DOUT      25  // Data Out (DIN on the amplifier)
#define I2S_BCLK      27  // Bit Clock (BCLK on the amplifier)
#define I2S_LRC       26  // Left/Right Clock or Word Select (LRC on the amplifier)

void setup() {
  Serial.begin(115200);

  // 1. Configure the I2S peripheral
  i2s_config_t i2s_config = {
    .mode = (i2s_mode_t)(I2S_MODE_MASTER | I2S_MODE_TX),
    .sample_rate = 44100, // Standard CD quality sample rate
    .bits_per_sample = I2S_BITS_PER_SAMPLE_16BIT,
    .channel_format = I2S_CHANNEL_FMT_RIGHT_LEFT,
    .communication_format = I2S_COMM_FORMAT_STAND_I2S,
    .intr_alloc_flags = ESP_INTR_FLAG_LEVEL1, // Interrupt level 1
    .dma_buf_count = 8,
    .dma_buf_len = 64,
    .use_apll = false,
    .tx_desc_auto_clear = true,
    .fixed_mclk = 0
  };

  // 2. Route the I2S signals to the correct GPIO pins
  i2s_pin_config_t pin_config = {
    .bck_io_num = I2S_BCLK,
    .ws_io_num = I2S_LRC,
    .data_out_num = I2S_DOUT,
    .data_in_num = I2S_PIN_NO_CHANGE // We are only transmitting (TX), not receiving
  };

  // 3. Install the driver and set the pins
  i2s_driver_install(I2S_NUM_0, &i2s_config, 0, NULL);
  i2s_set_pin(I2S_NUM_0, &pin_config);

  Serial.println("I2S Audio Initialized! Ready to stream data.");
}

void loop() {
  // Your audio playback streaming logic goes here!
}
In our next steps, we’ll connect this up to a speaker and write the logic inside our loop() to actually stream an audio file directly out to our I2S amplifier!
Hardware You’ll Need
To follow along with this lesson, you’ll need the following components: