ElectronParade
Lesson 142: Going Wireless - Introduction to Bluetooth (HC-05)
Infrared remotes (from Lesson 141) are great, but they require a clear line of sight. If you want to control your robot from another room, or if you want to send actual text and data back and forth, you need a radio-frequency connection.
Welcome to Bluetooth. In this lesson, we will connect an HC-05 Bluetooth Module to our Arduino, allowing us to send commands from a smartphone directly to our microcontroller.
 The HC-05 module acts as a wireless serial bridge between your phone and your Arduino.
What is the HC-05?
The HC-05 is a classic, low-cost Bluetooth module used in countless hobby electronics projects. To the Arduino, the HC-05 just looks like a standard Serial connection. Everything you Serial.print() to the HC-05 is broadcast over Bluetooth, and everything the HC-05 receives over Bluetooth is sent to the Arduino using Serial.read().
It acts as an invisible serial cable.
[Start building smartphone-controlled gadgets: HC-05 Bluetooth Module Arduino]
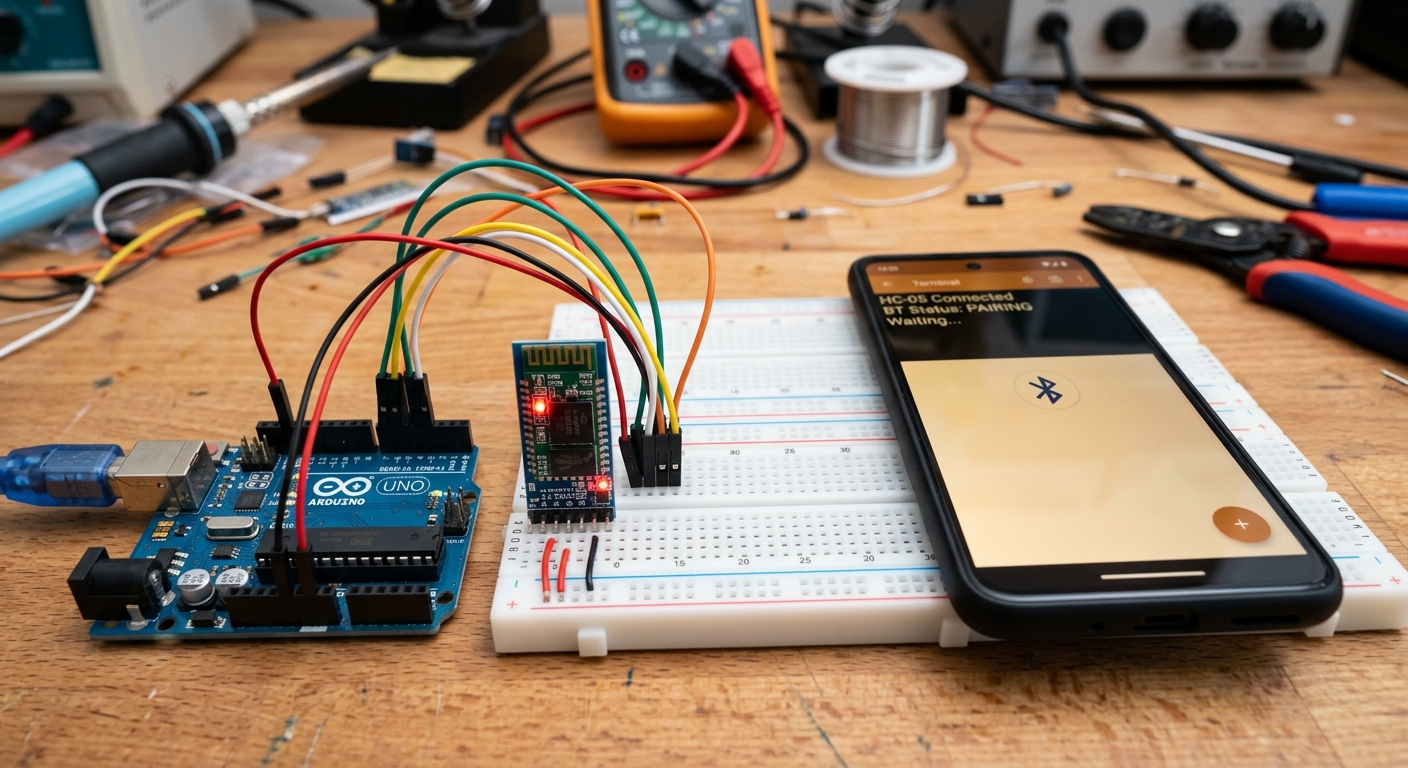
Wiring the HC-05
The standard HC-05 breakout board has four main pins:
- VCC: Connect to Arduino 5V.
- GND: Connect to Arduino GND.
- TXD (Transmit): Connects to Arduino RX (Receive).
- RXD (Receive): Connects to Arduino TX (Transmit).
Crucial Detail: Notice how TX goes to RX, and RX goes to TX? This is because what one device transmits, the other must receive.
Safety Note: The Arduino transmits 5V on its TX pin, but the HC-05’s RX pin technically expects 3.3V. Many people connect them directly without issue, but to be completely safe and ensure longevity, you should use a voltage divider (two resistors) to step the Arduino’s 5V TX down to 3.3V.
Using SoftwareSerial
While the Arduino Uno has built-in hardware Serial pins (Pins 0 and 1), using them for the Bluetooth module means you can’t use the USB cable to talk to your computer at the same time.
Instead, we use a built-in library called SoftwareSerial, which lets us turn any two regular digital pins into a secondary Serial port!
#include <SoftwareSerial.h>

// RX Pin 10, TX Pin 11
SoftwareSerial BTSerial(10, 11);
int ledPin = 13; // Built-in LED

void setup() {
  pinMode(ledPin, OUTPUT);
  // Start serial communication with the computer
  Serial.begin(9600);
  Serial.println("Ready to receive Bluetooth commands...");

  // Start serial communication with the HC-05
  // Default baud rate for HC-05 is usually 9600
  BTSerial.begin(9600);
}

void loop() {
  // If data is coming from the Bluetooth module
  if (BTSerial.available()) {
    char command = BTSerial.read();
    Serial.print("Received: ");
    Serial.println(command);

    if (command == '1') {
      digitalWrite(ledPin, HIGH); // Turn LED ON
      BTSerial.println("LED is ON");
    }
    else if (command == '0') {
      digitalWrite(ledPin, LOW);  // Turn LED OFF
      BTSerial.println("LED is OFF");
    }
  }
}
Connecting with Your Phone
To test this, you’ll need a Bluetooth Terminal app on your smartphone (search for “Serial Bluetooth Terminal” on Android or iOS).
- Pair your phone with the HC-05 in your phone’s Bluetooth settings (the default PIN is usually
1234or0000). - Open the Terminal app and connect to the HC-05.
- Type
1and hit send. The built-in LED on your Arduino should light up, and your phone will receive the message “LED is ON”!
You have officially bridged the gap between your mobile device and the physical world.