ElectronParade
Lesson 130: Power Up - Switching High Current with Relay Modules
Your Arduino is excellent at “thinking” and processing data, but it is fundamentally a low-power device. Its digital pins can output a maximum of 5 Volts and about 40 milliamps of current. That’s enough to light up an LED or run a small sensor, but what if you want your Arduino to turn on a 12V water pump, a loud siren, or an LED light strip?
To bridge the gap between low-power microcontrollers and high-power devices, we use a Relay.
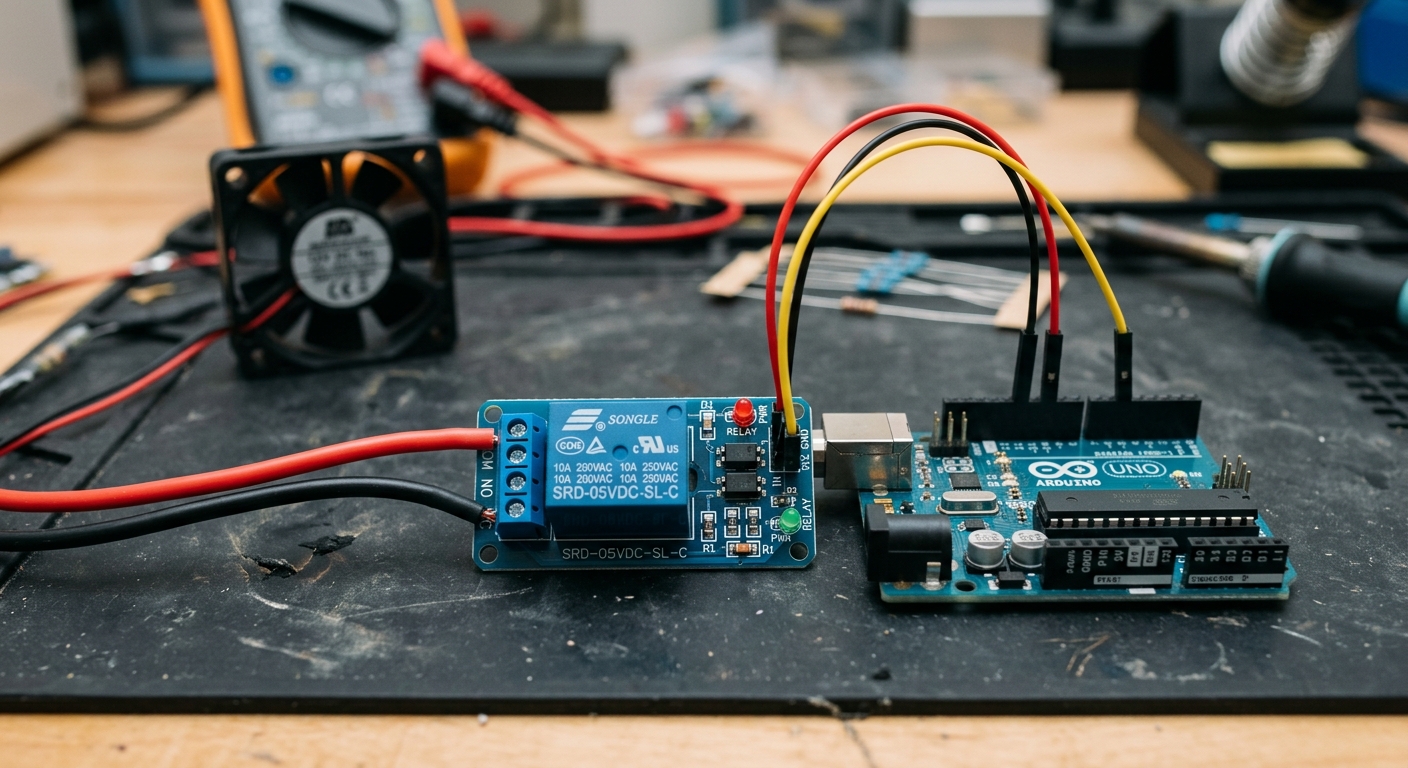 A relay module allows a small 5V signal to mechanically switch a completely separate, high-power circuit.
What is a Relay?
A relay is simply an electromechanical switch. Inside the little blue box on a relay module is an electromagnet. When the Arduino sends a small 5V signal to the relay, the electromagnet turns on, magnetically pulling a physical metal contact to close a much larger switch.
Because the low-voltage side (Arduino) and the high-voltage side (the device you are controlling) are physically separated by air, your Arduino is protected from dangerous power surges.
What You’ll Need
- An Arduino board (like the ELEGOO UNO R3)
- A 1 Channel 5V Relay Module
- Breadboard Jumper Wires
- A test device (like a 9V battery and a small DC motor or 12V LED strip)
Note: While relays can technically switch mains AC voltage (like wall outlets), we strongly advise beginners to stick to DC voltages under 24V. Working with mains AC power can be deadly if you make a mistake.
The Relay Terminals: NO, NC, and COM
On the high-power side of the relay (the screw terminals), you will see three connections:
- COM (Common): Power from your external battery/power supply goes in here.
- NO (Normally Open): Connect your device here if you want it to be OFF by default, and turn ON when the Arduino triggers the relay.
- NC (Normally Closed): Connect your device here if you want it to be ON by default, and turn OFF when the Arduino triggers the relay.
For most projects, you will wire your device between COM and NO.
Wiring It Up
Let’s connect the low-voltage side to the Arduino. It only takes three wires!
- Connect the Relay’s VCC (or +) pin to the Arduino’s 5V pin.
- Connect the Relay’s GND (or -) pin to the Arduino’s GND pin.
- Connect the Relay’s IN (Signal) pin to Arduino Pin 7.
The Code
The code for a relay is brilliantly simple. To the Arduino, a relay module acts exactly like a giant LED. You just turn the pin HIGH or LOW.
int relayPin = 7;

void setup() {
  // Set the relay pin as an output
  pinMode(relayPin, OUTPUT);
}

void loop() {
  // Turn the relay ON
  digitalWrite(relayPin, HIGH);
  delay(5000); // Wait 5 seconds

  // Turn the relay OFF
  digitalWrite(relayPin, LOW);
  delay(5000); // Wait 5 seconds
}
Upload the code. You will hear a satisfying click every 5 seconds as the electromagnet physically pulls the switch open and closed.
Try pairing this with the PIR Motion Sensor from Lesson 123 to create a motion-activated light!